Local Storage seems to be disabled in your browser.
For the best experience on our site, be sure to turn on Local Storage in your browser.
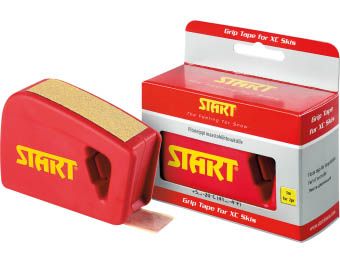
Start Grip Tape +5...-20°C, 5m
Start Grip Tape gives excellent grip for all conditions and therefore is no need to change the wax daily, when conditions change.
There is no need for extra waxing tools or special waxing rooms when adjusting Grip Tape.
The Start Grip tape box includes all that is needed for applying the tape. The box has 5 m of tape and it is enough for 2-3 pair of skis. When using tape, the skis are always ready for skiing!
Application:
Before application determine the length of your grip zone and the right length of Grip Tape. Note! When using Start Grip Tape the grip zone is shorter than when waxing with traditional kick waxes.
1. Clean the grip area thoroughly with Start Grip Tape cleaner or Start Wax remover. Be sure that the grip zone is completely dry after cleaning. You may dry out the cleaner with hot air gun or hair dryer.
2. Abrade the cleaned grip wax zone with the sandpaper on the side of the box. Abrade the grip zone first across and then back and fort. It is important that the whole grip zone is thoroughly abraded. Wipe the base clean with Start polishing fibre.
3. Apply the tip of Start Grip Tape onto the beginning of the cleaned and abraded grip zone. Press the Grip Tape onto the base. Draw the Grip Tape with the box. At the same time push the guide of the box lightly towards the side of the ski. This is how you get the Grip Tape straight.
4. Cut the Grip Tape off as follows: First press the brake with finger. Turn the box upwards. Push the cutting edge towards the Grip tape. Twofold the tip (1 cm) of the tape in the box after cutting.
5. Push Start Grip Tape tightly on the base with the side of the Tape box to get air bubbles away from between the base and the tape. Push both ends of the tape very tightly.
6. Remove the paper with one quick draw. If there still exist some light spots on the tape, put the paper back and push the tape tighter onto the base. This is how you can be sure that the tape sits well. Remove the paper.
7. Let the skis cool down outside. The skis are ready for skiing. Don’t touch onto the Grip Tape with hands. Don’t press the skis together so that the grip zones touch each other.
8. Remove the Grip Tape with Start XC-scraper. Moisten the scraper with Start Grip Tape Cleaner. Push the diagonal edge of the scraper towards the base. Draw the tape off. Clean the base with Start Grip Tape Cleaner.
| Temperature | +5...-20°C |
|---|---|
| Package Length | 5000 |

